8000 Feed Intake & In-Pen Weighing Solar System Installation
Field Services - Technical Manual
1. INSTALLING IN-PEN WEIGHING SOLAR PANELS, BATTERIES, AND SOLAR CONTROLLER
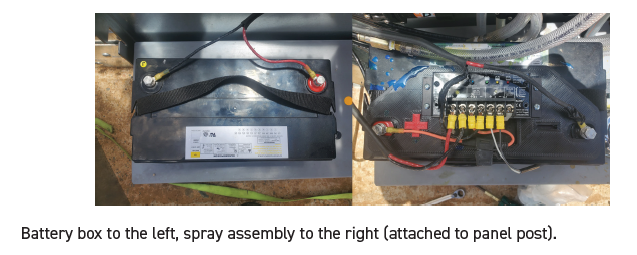
- With the covers on both the battery box and the spray assembly removed, install the batteries in the rectangle cut-out in the grey plastic tanks as depicted in the picture below.
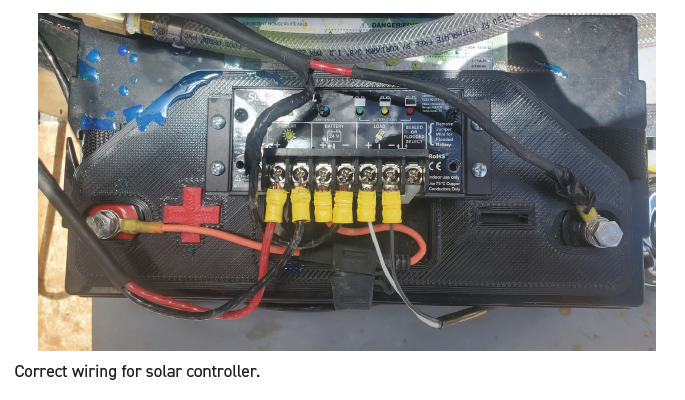
- Place the solar controller on top of the battery in the spray assembly so that the (+) and (-) symbols on the controller match up with the (+) and (-) terminals on the battery.
- Remove the cover and expose the controller terminals.
- There are 3 cables supplied with each solar panel system.
- The battery cable: Used to connect the two 12V batteries in series to make the 24V required to run the system.
- The DAQ panel power cable: Routed from the controller “LOAD” (+) and (-) terminals to the power plug on the DAQ panel.
- The solar panel power cable: Used to connect the solar panels to the “SOLAR” terminals on the connector. This connection is always made last.
5. First, install the battery cable through one of the centrally located horizontal fence posts and then through the oval cut outs on the vertical fence posts, into the battery box and the spray assembly. IMPORTANT: Be sure to have the end with 2 black wires facing towards the solar controller and always cover wire ends with electrical tape to prevent electrical shorting during assembly.
6. Connect the red (+) and black (-) wires to the battery in the battery box. Then at the spray assembly connect the red wire covered in black heat shrink to the battery negative terminal. This makes the series connection turning the voltage from 12V to 24V. Connect the black wire to the “BATTERY” (-) terminal on the solar controller.
- Remove the 15AMP fuse from the fuse holder on the “BATTERY” (+) and then connect the orange wire to the battery (+) terminal on the battery. Do not lose the 15AMP fuse, reinstalling it is the very last step to power on the system.
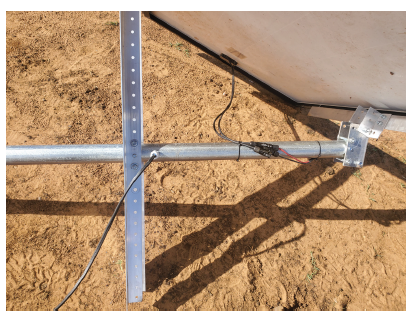
7. To set up the solar panel, mounting brackets, and pole retrieve the 2 solar panel mounting brackets and the bag of hardware supplied.
- Install the aluminum mounting brackets onto the solar panel using the matching holes.
- Install the pole into the brackets as shown above and tighten the hardware to secure.
- Tie the cables from the solar panel to the pole and connect the red positive connector to the solar power cable. When the pole is installed, the cable will be routed down into the panel post to the solar controller.
IMPORTANT: Leave the black connector unplugged to prevent an electrical hazard at the end of the solar power cable.
- Install the aluminum angle iron pole mounting brackets to the horizontal fencing using the supplied hardware and the rivet nuts that are preinstalled into the fencing. (Reference photos: https://photos.app.goo.gl/6woMnEmtHTzEZRQB8 )
- Position the bottom of the assembled solar panel pole near the base of the brackets and with assistance, raise the solar panel and pole into position and secure the pole with the supplies
U- bolts. Point the solar panel so that the angled portion faces true south and tighten the hardware. - Rout the solar power cable down the panel post and into the spray assembly box. Connect the red (+) and black (-) wires to the “SOLAR” (+) and (-) terminals. You can now connect the black (-) connection at the solar panel end of the cable.
8. Connect the DAQ panel power cable’s black wire to the solar controller “LOAD” negative (-) terminal and the white wire to the “LOAD” (+) terminal. Rout the cable up the panel post and plug it into the DAQ panel power plug.
9. Re-insert the 15AMP fuse into the fuse holder and check the panel for power. Contact your field service coordinator if the power does not come on.
Optimized for print with Google Chrome browser.